Introduction
The Creality Ender 3V3 series is one of the most talked-about upgrades in the 3D printing world. Alongside its powerful features, Creality also offers the Nebula camera, a compact accessory that allows users to monitor prints remotely.
However, to get the best angle and stable footage, a proper camera mount is essential. Instead of buying one, many hobbyists look for an Ender 3V3 Nebula Camera Mount STL free file to print themselves.
This guide explains everything you need to know about these mounts—from where to download them, how to print them, and how to install them on your Ender 3V3 printer. By the end, you’ll know exactly which design suits your needs and how to set it up for reliable print monitoring.
Overview of Nebula Camera Mount Designs
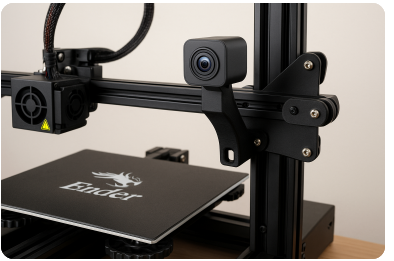
There are multiple free STL designs available for the Ender 3V3, each created by community makers. These vary in where they mount, how they attach, and how stable they are.
- X-Axis Mounts – These attach directly to the X-axis carriage and place the Nebula camera close to the print head. They usually don’t need screws and simply slide into place.
- Z-Axis Mounts – These attach to the vertical frame, typically near the filament run-out sensor. They provide a wider view of the print bed but require screws or a snug fit.
- Creality Cloud Mounts – Creality itself offers STL designs on its community platform. These are tested but often require M3 screws for attachment.
- Remixed Designs – On Thingiverse and Printables, you’ll find community remixes that fix earlier issues like loose fits or wide gaps. These designs often improve stability.
Choosing the Right Mount
Selecting the best mount depends on your printing setup and viewing preference.
- If you want a close-up of the nozzle, go for an X-axis mount.
- If you prefer a full view of the print bed, a Z-axis mount works better.
- If you don’t want to deal with screws, friction-fit X-axis models are ideal.
- If you value stability over quick installation, screw-based Z-axis mounts are the better choice.
Here’s a comparison table:
| Mount Type | Location | Stability | Installation | View Angle |
|---|---|---|---|---|
| X-Axis | Carriage | Medium | Easy (friction fit) | Close-up of nozzle |
| Z-Axis | Vertical frame | High | Needs screws | Wide print bed view |
| Creality Cloud | Z-Axis | High | Requires M3 screws | Stable, official |
| Remixed | X or Z | Improved | Varies | Fixed community issues |
Downloading and Preparing the STL
Free STL files are available on trusted sites like Printables, Thingiverse, and Creality Cloud. Before downloading, check:
- The file description for printer compatibility.
- User comments to see if others faced issues with sizing or fit.
- Version updates, as designers often refine their models.
Since these files are shared by the community, always respect the license—some are free to modify and share, while others may only allow personal use.
Printing Guide
Once you download your Ender 3V3 Nebula Camera Mount STL free, it’s time to prepare it for printing.
- Material: PLA works fine, but PETG offers more durability.
- Layer Height: 0.2 mm is recommended for balance between detail and speed.
- Infill: 20–30% is enough to keep it lightweight yet sturdy.
- Supports: Needed for some X-axis designs but not for simpler Z-axis ones.
- Print Time: Depending on the design, most mounts print in 45 minutes to 2 hours.
After printing, check the fit. You may need light sanding for smoother installation.
Installation Instructions
Installation depends on the type of mount you’ve chosen:
- Friction-fit X-axis mount: Slide the mount onto the carriage rail. Adjust its tightness if necessary by sanding or lightly heating the part.
- Screw-mounted Z-axis design: Use M3x10 screws to secure the mount on the vertical frame. Make sure the camera is pointed at the build plate.
- Creality Cloud version: Follow the provided instructions as these are official designs tailored for specific models.
Tip: Always test the angle before starting a print. A quick dry run ensures the camera captures your desired view.
Usage and Maintenance
Once installed, your Nebula camera will give you real-time print monitoring. To keep things smooth:
- Check that the mount is not vibrating during fast movements.
- Adjust the angle occasionally if switching between tall and flat prints.
- If you plan on swapping mounts, print a couple of different versions and keep them ready for quick changes.
Community Feedback and Improvements
The 3D printing community is highly active in improving designs. Many users have reported that early Nebula mounts were too wide or unstable. Remixed versions have fixed these issues by tightening tolerances or adding extra support.
If you find a flaw in your chosen design, you can modify the STL in software like Fusion 360 or TinkerCAD. Better yet, share your improved design back with the community to help other Ender 3V3 users.
Conclusion
The Ender 3V3 Nebula Camera Mount STL free options available online make it easy for users to set up their Nebula cameras without spending extra money. Whether you prefer the X-axis for close views or the Z-axis for full coverage, there’s a free STL design for you.
By carefully choosing the right model, printing with the right settings, and installing it securely, you’ll enjoy stable, high-quality monitoring of every print. The best part? It’s all community-driven, open, and free.
Related Articles
Roselyn Wimbley High-Tech-Inspections: A Deep Dive into Cutting-Edge Inspection Innovation
Gigabyte B650 Gaming X AX Motherboard SCSI Support, Features & Full Specs Guide
Best Case Logic Case for Kodak M341 Camera – Full Guide with Features, Fit & Buying Tips
Nucleus PSG Tech – Complete Guide to PSG College’s Digital Learning Platform